MIDI Mapping
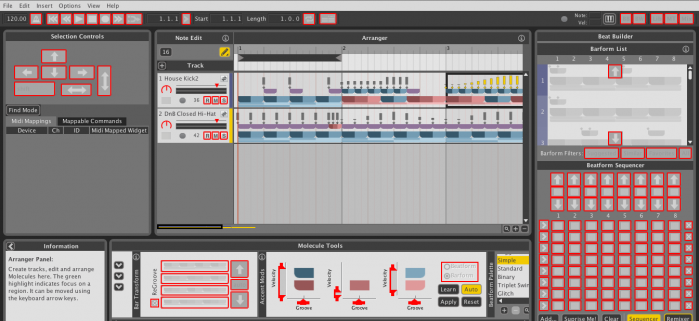
At WaveDNA, we understand the importance and appeal of the music making process being mostly tactile, that is- hands on. With that in mind, most of Liquid Rhythm’s interface can be MIDI Mapped:
It’s also been programmed to function smoothly and automatically with a wide variety of MIDI hardware. So, whether you’re using a Push, Livid, Akai, Novation, Alesis, M-Audio, or any other piece of hardware, you’ll be able to assign the faders, knobs, and buttons in Liquid Rhythm to the physical faders, knobs, and buttons on your hardware.
This makes incorporating Liquid Rhythm into your live setup easy. Check out these two guys improvising some instrumental ditty using a Smithson Martin DVS touchscreen and Emulator to control Liquid Rhythm: http://www.youtube.com/watch?v=BNwlN_sMZGQ
Pretty sweet, no?
That’s not all you can do though! If you’re producing a beat at home, this also gives you the ability to record all sorts of MIDI changes in your project.
The possibilities are actually endless.
To activate MIDI Mapping mode, either:
- Click the MIDI button on the toolbar
- Press [command]+[M] on your keyboard
To create a MIDI assignment:
- With MIDI Mapping active, click any of the UI items with a red border.
- Move a physical knob/fader or press a button/note/pad on your hardware controller.
As you make MIDI assignments, you’ll notice the Mappings list grow:
Keep track of your work using this list, and when you’re ready, save your MIDI Map:
- Click Options > MIDI Mapping Mode > Export MIDI Mapping… to open the Save MIDI Mapping dialogue box.
- Name your MIDI Map and click Save.
Note that you can also import previously saved MIDI maps.

